> ## Documentation Index
> Fetch the complete documentation index at: https://thekiloapp.com/help/llms.txt
> Use this file to discover all available pages before exploring further.
# Track Your Progress
> Read the Progress tab: estimated 1RM, status labels, per-exercise charts, session history and the Trends charts.
The **Progress** tab shows how your lifts move over time. It has two views: **Exercises**, where you open one exercise and see its numbers, and **Trends**, which sums up all your training.
## Open an exercise page
1. Open **Kilo** and tap the **Progress** tab.
2. Make sure **Exercises** is selected at the top.
3. Tap **✓ Logged** to hide exercises you have not done yet.
Each row shows how many sessions include the exercise and when you last did it. Tap a row to open its page.
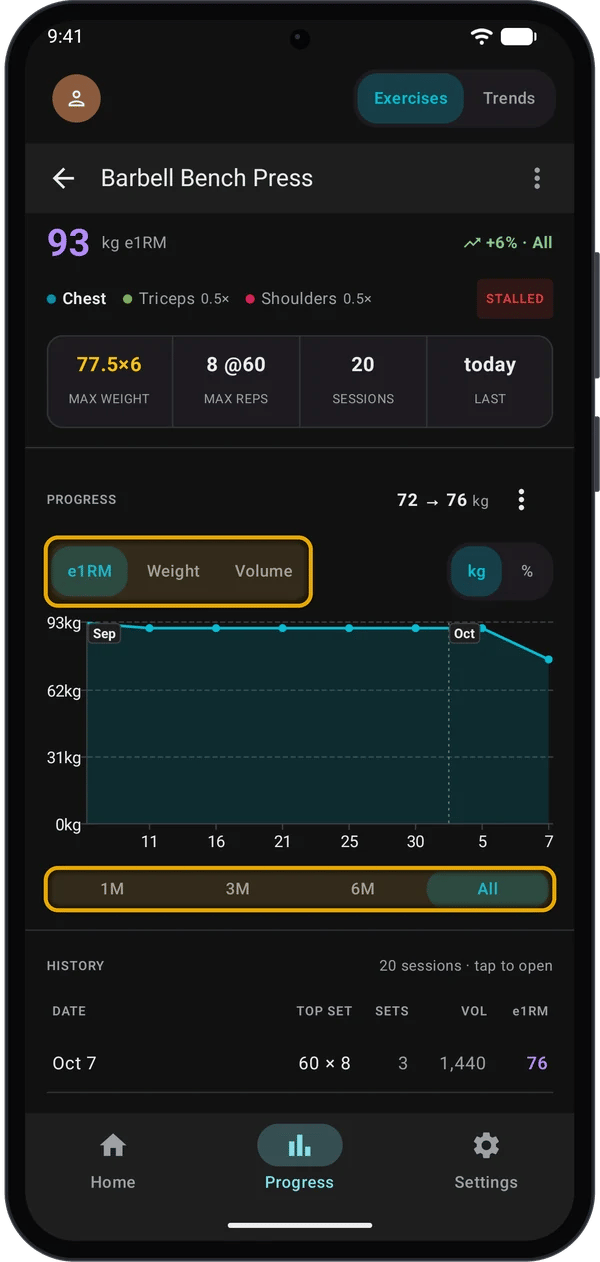
The page opens with the exercise name at the top and a large e1RM number.
## Read the exercise page
### The headline
| Item | What it shows |
| - | - |
| **e1RM** (large number) | Your best estimated one-rep max for this exercise, from any session. |
| **Change** (for example **+6% · All**) | How the per-session e1RM changed from the first to the last session in the chart's range. |
| **Muscles** | The primary muscle, then secondary muscles marked **0.5×**. See [Trends](#trends) for what 0.5× means. |
| **Status** | **NEW**, **PROGRESSING**, **HOLDING** or **STALLED**. See [How Kilo works out e1RM and status](#how-kilo-works-out-e1rm-and-status). |
The change and the status follow the range you pick under the chart. Both need at least two sessions in that range; with fewer, they do not show.
### The stats ribbon
| Stat | What it shows |
| - | - |
| **MAX WEIGHT** | Your heaviest set, as weight × reps. |
| **MAX REPS** | The set with the most reps, with its weight. |
| **SESSIONS** | How many workouts include this exercise. |
| **LAST** | When you last did it. |
### The chart
The **PROGRESS** chart plots one point per session.
Tap **e1RM**, **Weight** or **Volume**.
| Metric | One point = |
| - | - |
| **e1RM** | The best estimated 1RM in that session. Tap **kg** or **%** to show weight, or the change from the first point shown. |
| **Weight** | The heaviest set that day. |
| **Volume** | Weight × reps, added up for the session. |
A bodyweight exercise with no weight logged (push-ups, pull-ups) shows a **Reps** chart instead: the average reps per set each day. The metric buttons do not show.
Tap **1M**, **3M**, **6M** or **All** under the chart. The chart scrolls sideways when it holds more points than fit on screen.
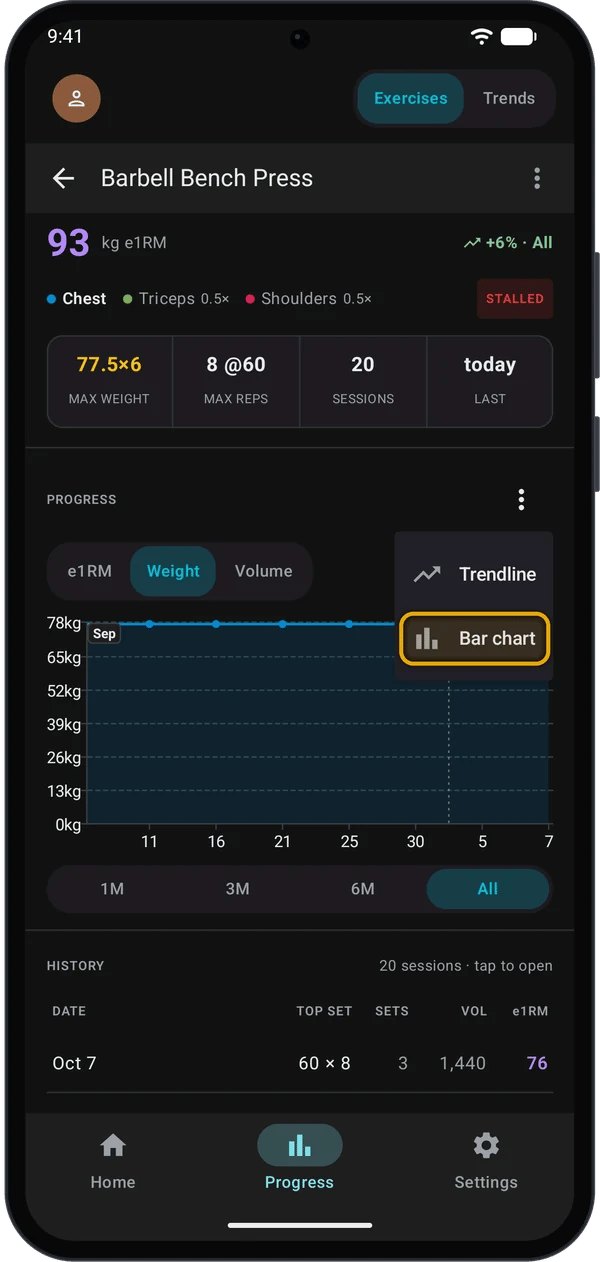
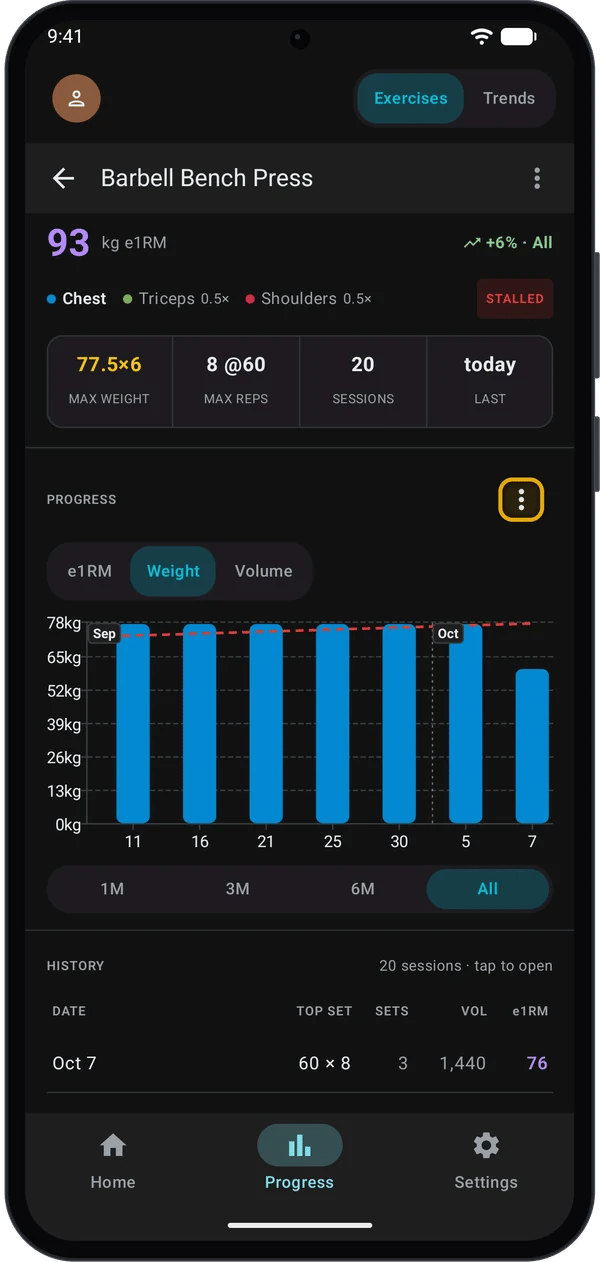
Tap the **⋮** button beside the chart title.
* **Bar chart** / **Line chart** switches the chart type. Kilo remembers your choice for each metric.
* **Trendline** draws a straight best-fit line through the points.
Change the trendline colour in **Settings** → **APPEARANCE** → **Trendline Color**.
### Session history and how-to
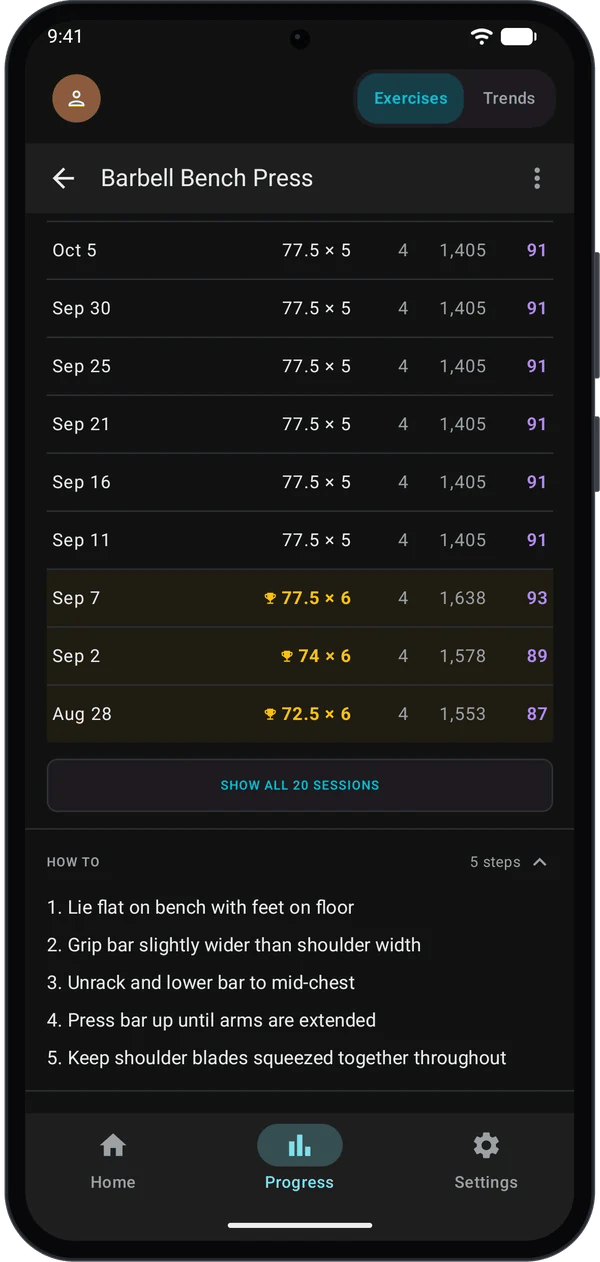
Under the chart, **HISTORY** lists one row per workout, newest first: the date, the top set, the number of sets, the session volume and the session e1RM. Rows that set a personal record are marked with a trophy. Tap a row to open that workout. Tap **SHOW ALL** to see more than the first 10 rows.
**HOW TO** opens the step-by-step instructions for the exercise.
## How Kilo works out e1RM and status
**e1RM** (estimated one-rep max) uses the Epley formula:
```
e1RM = weight × (1 + reps ÷ 30)
```
A set of 77.5 kg × 6 gives 77.5 × 1.2 = 93 kg. A single rep counts as its own weight. Drop sets are left out; warm-up sets count.
The **status** looks at the per-session e1RM values in the chart's range:
| Label | Meaning |
| - | - |
| **NEW** | Fewer than two sessions in the range. |
| **STALLED** | Your best e1RM in the range was 3 or more sessions ago. |
| **PROGRESSING** | Not stalled, and the trendline through the points goes up. |
| **HOLDING** | Not stalled, and the trendline is flat or goes down. |
STALLED wins over the trend. A lift can show **+6%** and **STALLED** at the same time: it went up early in the range, then stopped setting new bests.
## Trends
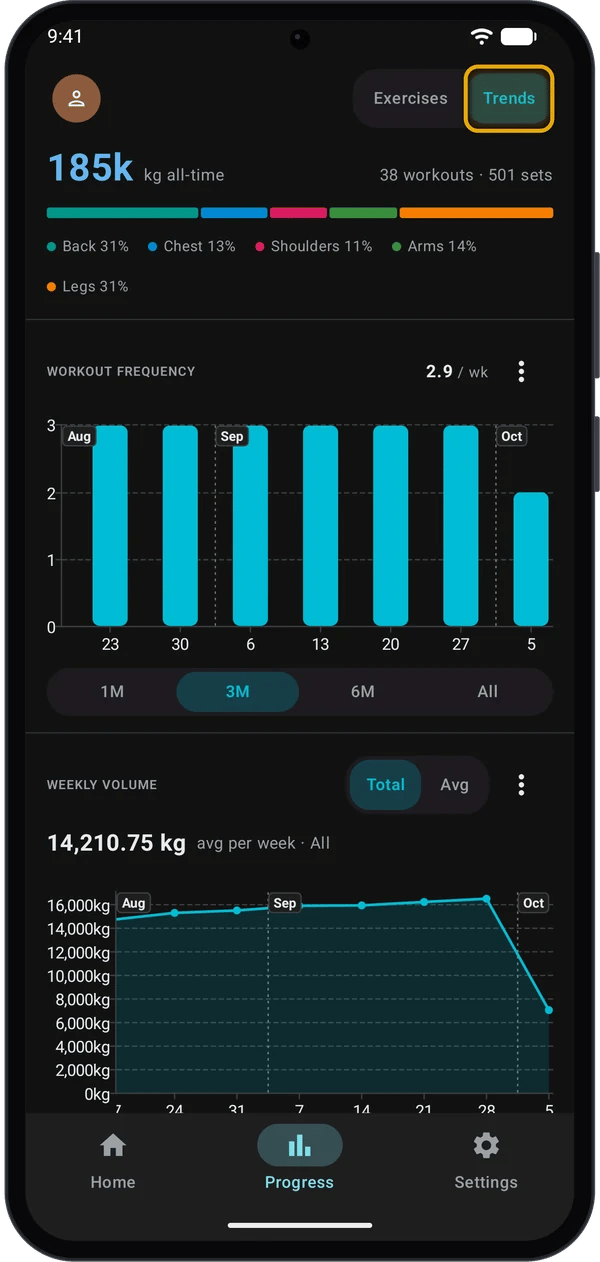
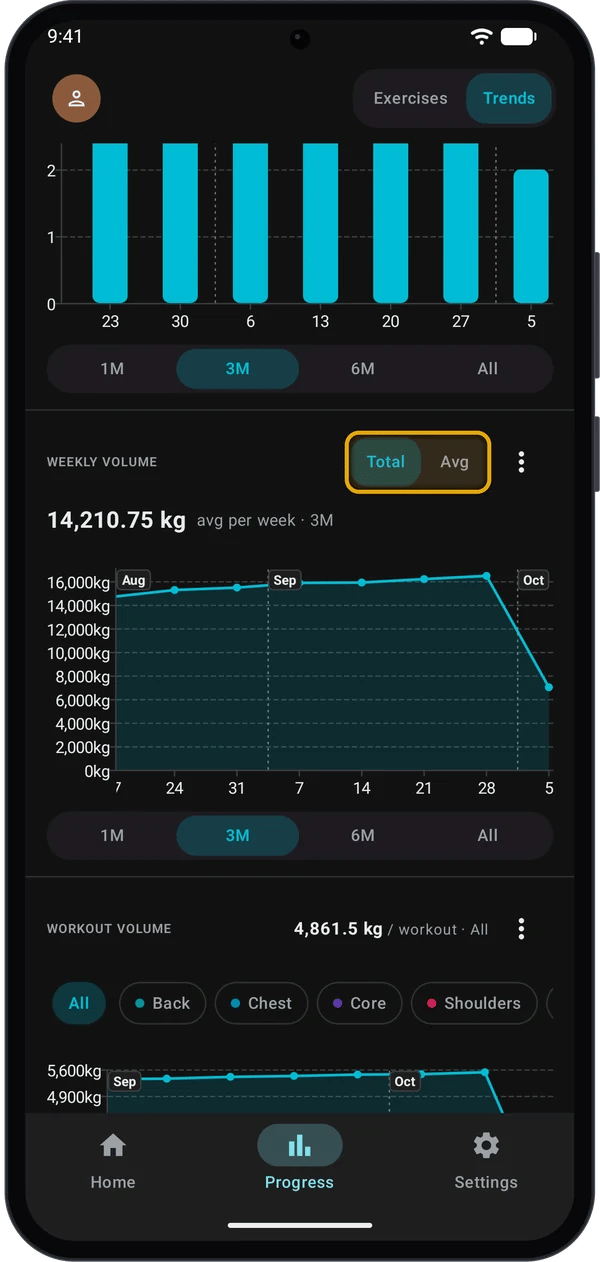
Tap **Trends** at the top of the Progress tab. The top shows your all-time volume, the number of workouts and sets, and a bar that splits the volume by body region.
Every chart on this page has the same **⋮** options (trendline, line or bars) and the same range buttons as the exercise page.
### Workout frequency
One bar per week, counting finished workouts. The number beside the title is the average per week in the range you picked. This chart starts on **3M**; the others start on **All**.
### Weekly volume
Tap **Total** or **Avg** in the title row:
| Mode | Chart points | Number under the title |
| - | - | - |
| **Total** | Volume added up per week | Average weekly total in the range |
| **Avg** | Average volume per workout, per week | Average per workout in the range |
For **1M**, **3M** and **6M**, a second line compares the number with the same length of time just before the range (for example **+5% vs prev 3M**). It shows only when both periods have workouts.
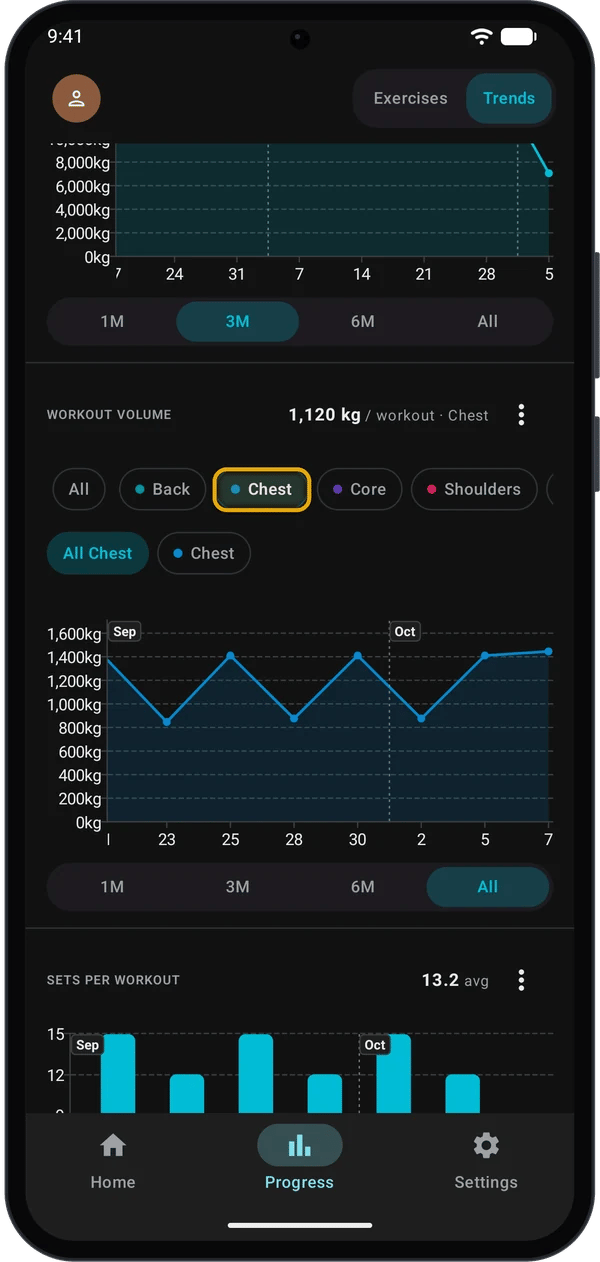
### Workout volume by muscle
One point per workout. Tap a region chip (**Back**, **Chest**, **Core**, **Shoulders**, **Arms**, **Legs**) to show only the volume that region got; a second row of chips then narrows it to one muscle. The number beside the title is the average per workout for that filter.
How volume is credited to muscles:
* The exercise's **primary** muscle gets the full set volume (1×).
* Each **secondary** muscle gets half (0.5×). You see these on the exercise page.
* A set whose exercise was deleted from your exercise list counts as **Other**.
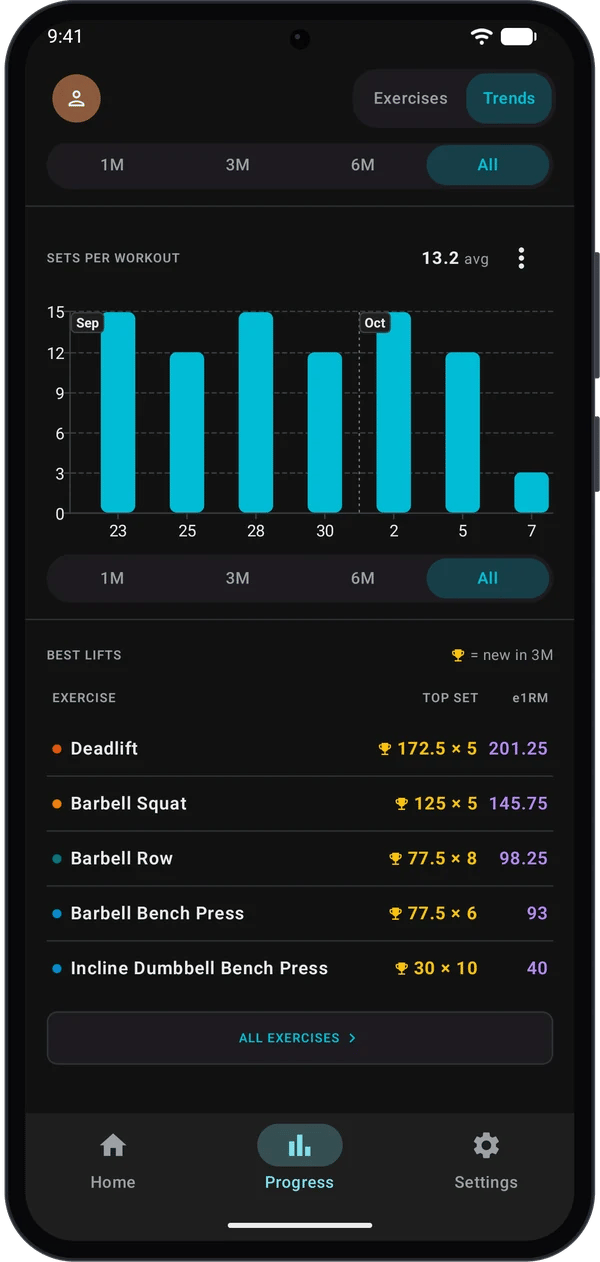
### Sets per workout
One bar per workout, counting completed sets. The number beside the title is the average in the range.
### Best lifts
The five exercises you have done most often, sorted by e1RM. Each row shows the top set that stands as your current weight PR and its e1RM. A trophy means that PR was set in the last 3 months. Tap **ALL EXERCISES** to go back to the Exercises list.
## Free and Pro
| Feature | Free | Pro |
| - | - | - |
| Chart ranges | **1M** and **3M** | **1M**, **3M**, **6M** and **All** |
| Trendlines | — | Yes |
Locked ranges and the locked **Trendline** item show a padlock. Tapping them opens the upgrade screen. See [Kilo Free vs Pro](/help/kilo-free-vs-pro).
## Quick fixes
The chart needs at least two sessions in the range you picked. Pick a longer range or log another workout.
The status needs two or more sessions in the chart's range. Pick a longer range.
Tap **✓ Logged** to turn the filter off, or clear the search box and the muscle chips.
The headline e1RM comes from your best single set. A set logged as a drop set is not counted.
## Next steps
See how a program raises your weights from session to session.
Compare what each tier includes.
This documentation is built and hosted on [Mintlify](https://mintlify.com), a developer documentation platform.